 This is just a preview of what I'm currently doing. I still have several hours of detail work to do this week, and then I have to get on with a collaboration I'm doing with Keith Tompkins. This was a photo of the early rough-out that I took back in March. It doesn't look much like this anymore. I'll post the finished project pic sometime this week or next weekend. In the meantime, you'll have to guess what the motif is all about. It's botanical (as usual).
Jack-of-all-trades, master of some pretty much describes my life. This blog has several themes: wood turning, photography, travel, science, fieldwork, family, friends, music, and miscellaneous things I encounter. I hope you enjoy it - feel free to leave a comment to let me know you've been here.
Monday, May 29, 2006
Another new project
 This is just a preview of what I'm currently doing. I still have several hours of detail work to do this week, and then I have to get on with a collaboration I'm doing with Keith Tompkins. This was a photo of the early rough-out that I took back in March. It doesn't look much like this anymore. I'll post the finished project pic sometime this week or next weekend. In the meantime, you'll have to guess what the motif is all about. It's botanical (as usual).
Wednesday, May 24, 2006
A foliage study: Hosta
Those of you who have seen my work know that I focus on botanical motifs. Most recently I've been doing 3-D carvings of maple (Glory of Autumn series and Dylan's Song) and oak leaves (Quercus rubra). One of the ways I achieve such realism in my carved vessels, besides the fact that I'm a botanist in my day job, is the intense study I make of foliage. I love looking at leaves up close and personal - sometimes by just holding them in my hands, sometimes through the lens of a camera, and sometimes under the dissecting microscope. Here is an example of a photographic study of foliage using Hosta as an example. These hostas were growing in Whetstone Park of Roses - a place Steve and I like to walk with Emma.
What I'm specifically looking for in these photographic studies is the way the light plays off the leaves, how the leaves curl and fold, how the veins and laminar surfaces appear. I'm drawn to the work of Georgia O'Keefe and I like to think that the intense scrutiny I do of leaves and leaf surfaces help me to achieve something special in my work.
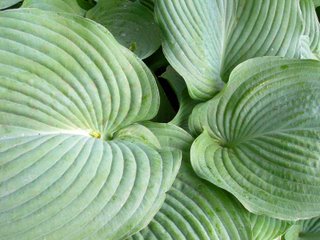
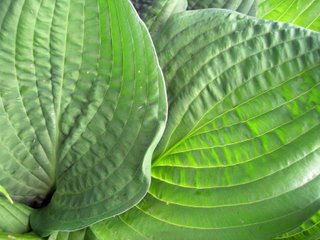
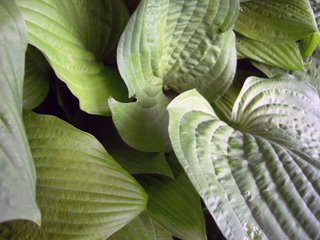
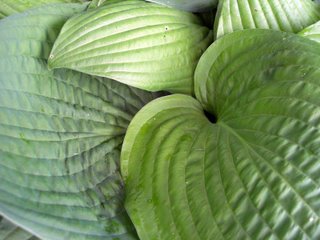
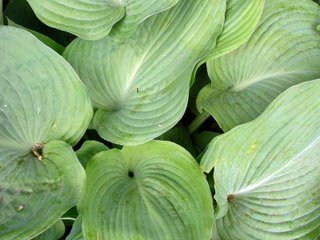
What I'm specifically looking for in these photographic studies is the way the light plays off the leaves, how the leaves curl and fold, how the veins and laminar surfaces appear. I'm drawn to the work of Georgia O'Keefe and I like to think that the intense scrutiny I do of leaves and leaf surfaces help me to achieve something special in my work.


How I spent last weekend
Friday evening and all day Saturday were spent at the Chamber Music Connection Spring Festival. Meghan played double bass in a trio with her friends Dina and Katie. They did a Haydn piece. Steve and I played in a quartet - two flutes, clarinet, and my hammer dulcimer (I played the cello part). We did a movement from a C major quartet by J. C. Bach. The Cavani quartet from Cleveland was the big draw - Friday night concert was totally amazing. They also did master classes all day long on Saturday. My quartet had two master classes - one with Steven Huang in the morning, and the second with the violist from Cavani quartet. It was really fun to work up this piece with the odd assortment of instruments - it presented a challenge for our coaches. We did pretty well, especially given such short notice to rehearse the piece.
Here are a few pics:
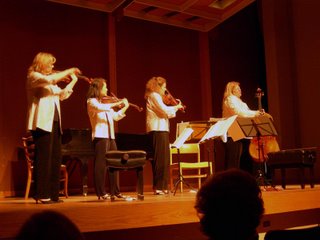
The encore by Cavani was a pop tune sung by Merry, the cellist. What a lot of fun! The concert was totally amazing. They started with a piece featuring piano and viola. Annalisa Boerner played the viola part of the quartet while the Cavani violist did an amazing piece of work on the solo parts. They also did an interesting piece by Bartok.
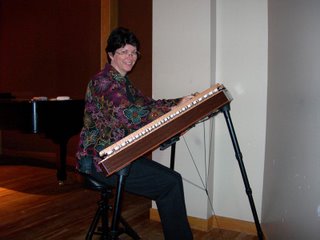
Steve took a picture of me tuning my dulcimer right before the Saturday concert. I needed to let the instrument stabilize in the auditorium before tuning, and then it stayed on stage during the entire concert.
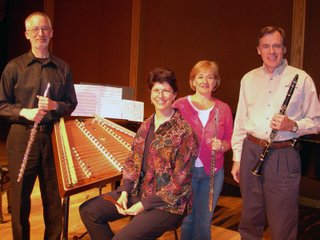
Here are the quartet members (L to R): Steve Wolfe, Andi Wolfe, Chris and Bob.
Here are a few pics:

The encore by Cavani was a pop tune sung by Merry, the cellist. What a lot of fun! The concert was totally amazing. They started with a piece featuring piano and viola. Annalisa Boerner played the viola part of the quartet while the Cavani violist did an amazing piece of work on the solo parts. They also did an interesting piece by Bartok.

Steve took a picture of me tuning my dulcimer right before the Saturday concert. I needed to let the instrument stabilize in the auditorium before tuning, and then it stayed on stage during the entire concert.

Here are the quartet members (L to R): Steve Wolfe, Andi Wolfe, Chris and Bob.
Friday, May 19, 2006
Quercus rubra
I just got my images back from Jerry Anthony Photography. He did a good job of capturing the movement and composition of my new project. The piece is made from African Sumac and is 9.5 X 3 inches in size. Actually, when it's tilted, it's 4 inches tall.
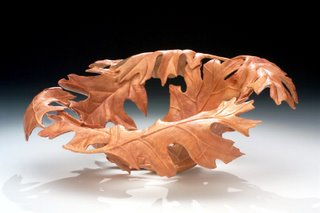
I'm very glad to be done with this project. I hope it finds a good home over the summer. Although I'd like to keep one of my carved turnings at some point in the future, I have to be practical, and try to sell it for a good price.
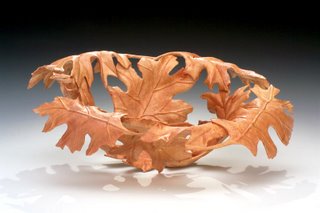
Here's another view of the topside.
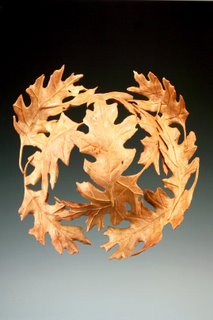
And here's a view of the back. There's as much detail on the back as the front. Maybe that's not very practical, but I'm such a perfectionist that I couldn't do otherwise.
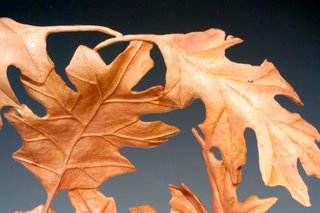
Here's a detail view of the carving. I've really honed my carving skills on this project. Each one of these carved turnings gets a bit better. I just wish that translated into getting faster as well. It seems as if I've really slowed down a lot as I spend the time to do the necessary detail work.
Previous posts in this series, beginning on January 3, 2006: Part I, Part II, Part III, Part IV, Part V, Part VI, Part VII, Part VIII, Part IX, Part X, Part XI, and Part XII.

I'm very glad to be done with this project. I hope it finds a good home over the summer. Although I'd like to keep one of my carved turnings at some point in the future, I have to be practical, and try to sell it for a good price.

Here's another view of the topside.

And here's a view of the back. There's as much detail on the back as the front. Maybe that's not very practical, but I'm such a perfectionist that I couldn't do otherwise.

Here's a detail view of the carving. I've really honed my carving skills on this project. Each one of these carved turnings gets a bit better. I just wish that translated into getting faster as well. It seems as if I've really slowed down a lot as I spend the time to do the necessary detail work.
Previous posts in this series, beginning on January 3, 2006: Part I, Part II, Part III, Part IV, Part V, Part VI, Part VII, Part VIII, Part IX, Part X, Part XI, and Part XII.
Wednesday, May 17, 2006
"Watching for voices"
I'm reading a book by Lyanda Lynn Haupt called, Pilgrim on the great bird continent: the importance of everything and other lessons from Darwin's lost notebooks. It's about Charles Darwin's early observations as a naturalist voyaging on the Beagle. I've just finished chapter two, and I'm enjoying the book very much. The reason I'm mentioning it is because of a paragraph toward the end of chapter two that focuses my mind on the parallels between art and science. I've always argued that my science feeds my art and art plays a huge role in my life as a scientist. It's all about learning to "see." Here's the quote from the book (pp. 46 - 47):
"But it was unclear to Darwin at the start that the most original thing he would uncover was his own method, that his way of seeing and casting light on what he saw was the very thing that would allow his eventual scientific contributions. He didn't realize that he was in the thick of creating his life's most significant habit -- transforming the activities of daily life into scientific insights."
Learning to "see" and finding one's own "voice" as an artist also applies to science.
Here's a link to the book at Amazon.com: Pilgrim on the great bird continent: the importance of everything and other lessons from Darwin's lost notebooks
Sunday, May 14, 2006
New Project - Part XII - All done!
Happy Mother's Day to me! I had a very nice day today, beginning with a long walk at Whetstone Park of Roses. Yesterday and today that walk was in the rain, but that wasn't too bad. We saw a lot of birds, and Emma didn't mind getting all wet and muddy. I also finished my oak leaf project at last. I'm so relieved to have this one done. I have another carving I need to work on in the next couple of weeks to get ready for the summer symposia, plus a collaboration which will involve some carving. I need to go much faster now - this project just ate up a lot of time because it was so intricate in the layout.
To top off the day, Meghan and Richard decided that I shouldn't have to cook on Mother's Day, so they fixed dinner tonight. Of course, I had to go to the store to buy all the supplies and so on . . . They did fine, and even cleaned up the mess.
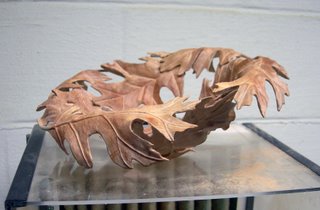 Here's the finished carving before I took it over to my lab and zapped it with the UV crosslinker. It's been slowing changing color as I've been working, but I want it to be a rich red brown. Since J. Paul Fennell achieves the red coloration on African Sumac by exposing the wood to sunlight, I figured some high intensity UV irradiation would do the same thing, except in a much shorter time period.
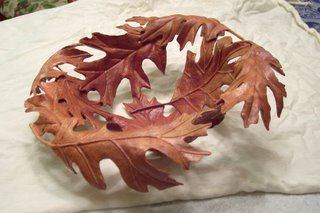
Here's what it looks like after 10 minutes of high UV exposure. I also put a coat of penetrating oil on after bringing it home. It started changing in just a minute's time exposure. It was a tight fit - the edges of the box were about the same width as the diameter of the bowl. If it doesn't settle into the red I'm seeking, I'll take it back to the lab in a week or so and zap it again.
I've decided the title of this piece will be: "Quercus rubra." That's the botanical name of red oak, which is what the leaf design is from. Now I just have to make an appointment to take this to my photographer, Jerry Anthony. I need to let the oil cure first, and then I have to pick off all the cotton lint under the magnifiers. Jerry has a knack for finding the lint with a 50 mm macro lens.
Previous posts in this series, beginning on January 3, 2006: Part I, Part II, Part III, Part IV, Part V, Part VI, Part VII, Part VIII, Part IX, Part X, and Part XI.
To top off the day, Meghan and Richard decided that I shouldn't have to cook on Mother's Day, so they fixed dinner tonight. Of course, I had to go to the store to buy all the supplies and so on . . . They did fine, and even cleaned up the mess.
 Here's the finished carving before I took it over to my lab and zapped it with the UV crosslinker. It's been slowing changing color as I've been working, but I want it to be a rich red brown. Since J. Paul Fennell achieves the red coloration on African Sumac by exposing the wood to sunlight, I figured some high intensity UV irradiation would do the same thing, except in a much shorter time period.
Here's what it looks like after 10 minutes of high UV exposure. I also put a coat of penetrating oil on after bringing it home. It started changing in just a minute's time exposure. It was a tight fit - the edges of the box were about the same width as the diameter of the bowl. If it doesn't settle into the red I'm seeking, I'll take it back to the lab in a week or so and zap it again.
I've decided the title of this piece will be: "Quercus rubra." That's the botanical name of red oak, which is what the leaf design is from. Now I just have to make an appointment to take this to my photographer, Jerry Anthony. I need to let the oil cure first, and then I have to pick off all the cotton lint under the magnifiers. Jerry has a knack for finding the lint with a 50 mm macro lens.
Previous posts in this series, beginning on January 3, 2006: Part I, Part II, Part III, Part IV, Part V, Part VI, Part VII, Part VIII, Part IX, Part X, and Part XI.
Saturday, May 13, 2006
New Project - Part XI
I've managed to find some time this week to nearly finish my oak leaf bowl. I have only one more leaf surface to finish on the backside, and then the carving will be done. I might actually finish the carving tomorrow, which would be a very nice Mother's Day gift to myself.

This view is how the profile is shaping up. I think it will tilt like this after the last leaf is carved. There's more weight on the one side compared to the other, so it should balance without me having to put it on a stand for display.
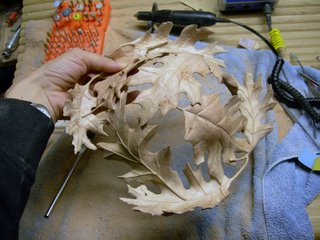
I'm holding the last unfinished leaf on the left. You can get an idea of the back side in this view. The points on the leaves are all in line with the grain, so they aren't as fragile as they would otherwise be. I've had plenty of opportunities to break off the points. I try to be very careful as I'm moving the bowl around the carving bench, but when I'm concentrating and have my occulars on, I tend to run into things. This bowl is pretty tough!
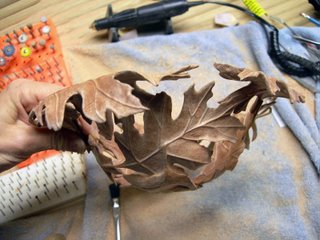
Here's another view of the profile. The leaves are thin enough in spots to be translucent, and thinner in other spots that have become bug bites. The thickest spots (where two leaves overlap) are probably 1/8 inch - most of the bowl is 1/16th inch or less in thickness.
I've been leaving the fluorescent lights on over my carving bench to try to help the oxidation along faster. If I finish the project tomorrow, I may just pop over to my lab and stick this in my UV crosslinker. That ought to emulate the Arizona sunshine. Paul Fennell zaps his African Sumac pieces with sunlight. I don't have that option right now. We've had a week of steady rain and more forecast for the next three days.
Previous posts in this series, beginning on January 3, 2006: Part I, Part II, Part III, Part IV, Part V, Part VI, Part VII, Part VIII, Part IX, and Part X.

This view is how the profile is shaping up. I think it will tilt like this after the last leaf is carved. There's more weight on the one side compared to the other, so it should balance without me having to put it on a stand for display.

I'm holding the last unfinished leaf on the left. You can get an idea of the back side in this view. The points on the leaves are all in line with the grain, so they aren't as fragile as they would otherwise be. I've had plenty of opportunities to break off the points. I try to be very careful as I'm moving the bowl around the carving bench, but when I'm concentrating and have my occulars on, I tend to run into things. This bowl is pretty tough!

Here's another view of the profile. The leaves are thin enough in spots to be translucent, and thinner in other spots that have become bug bites. The thickest spots (where two leaves overlap) are probably 1/8 inch - most of the bowl is 1/16th inch or less in thickness.
I've been leaving the fluorescent lights on over my carving bench to try to help the oxidation along faster. If I finish the project tomorrow, I may just pop over to my lab and stick this in my UV crosslinker. That ought to emulate the Arizona sunshine. Paul Fennell zaps his African Sumac pieces with sunlight. I don't have that option right now. We've had a week of steady rain and more forecast for the next three days.
Previous posts in this series, beginning on January 3, 2006: Part I, Part II, Part III, Part IV, Part V, Part VI, Part VII, Part VIII, Part IX, and Part X.
Friday, May 05, 2006
New Project Part X
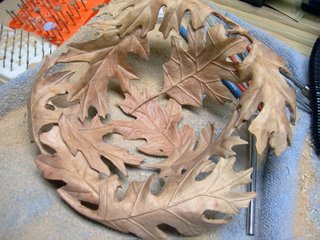
I just finished leaf surface number five on the back side. I have the most challenging leaf surfaces ahead of me as I begin to work on the rim. I'll have to be extra careful about where I apply pressure and how the bowl is placed on the work bench. I also went a little thin on these leaves, so I'm going to have to watch what I'm doing if I don't want to end up with a bunch of bug bits in the leaves. This is the top side as it's shaping up.
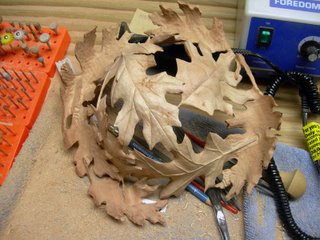
The backside is also coming along nicely. I just finished the bottom-most leaf this evening.
Previous posts in this series, beginning on January 3, 2006: Part I, Part II, Part III, Part IV, Part V, Part VI, Part VII, Part VIII, and Part IX.
Robins grow very fast!
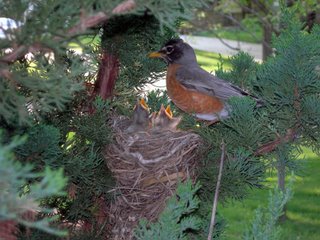 These chicks are less than a week old now, and their eyes are just starting to open. Their feathers are starting to come in, and they've about doubled in size from when they hatched. Boy, are they ugly critters when they're just getting started. We're enjoying their company very much. Mr. and Mrs. Robin are keeping busy with all the feedings they have to give these hungry chicks. They also are not really pleased with us when we get too close or disturb them while they're feeding the chicks. Being scolded by a robin is a new experience for me.
A mother's purgatory
Meghan's 6th grade orchestra at Jones Middle School had a field trip to Cincinnat on Wednesday. I "volunteered" to help chaperone. What that means is that no other parents volunteered so Meghan begged me to come. Somehow, the committee meeting I missed at work sounded awfully good after spending too many hours on a bus with 12 year olds. . .

The trip had two parts. First to the Cincinnati Music Hall to hear a joint concert by the Cincinnati Symphony Orchestra and the Cincinnati Symphony Youth Orchestra. There were dozens of other schools from around the state also in attendance. What a zoo!

Our school had seats up in the first balcony. In the Ohio Theatre, that would be the Loge section. The seats were fine, but you have to watch out for the posts getting in the way of the view. The sound was kind of dead in that hall. One would expect a double size orchestra to really fill the place with sound, but it was very quiet during the entire concert.
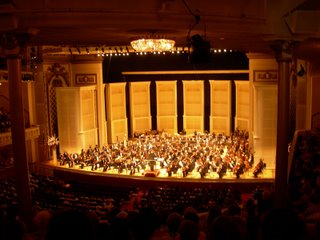
Fourteen double basses for a concert? Wow! Actually, the principal bassist from CSO wasn't there, so we had only 13 basses. The last selection feature three timpani players for the last section of the music.
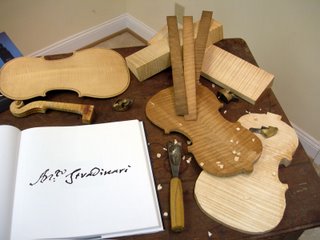
The next phase of the trip was a visit to the Baroque Violin Shop, which is owned by Paul J. Bartel. He's a violin maker and has two buildings. The first is a warehouse/shop/display room. He has an exhibit of Crimona violins, which is apparently his featured import. He has an exhibit showing the parts of a violin in the room where the Crimona instruments are on display.
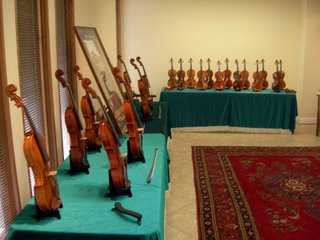
The kids went wild in here and tried all the instruments. It was pretty stressful - not only for me as a chaperone worrying about breakage, but none of the instruments were tuned, so I had to listen to the cacaphony of dissonance.
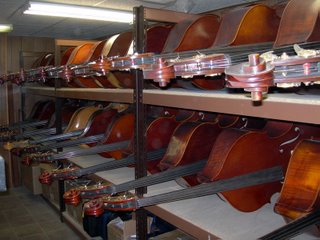
There was an impressive selection of double basses in the warehouse.

Meghan liked this room a lot!
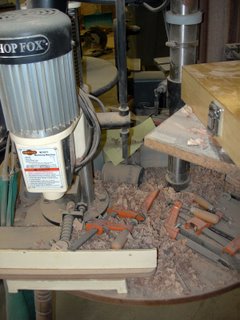
The workshop was in the warehouse, too. It looked liked any woodworking shop you'd care to visit. Maybe a little more chaotic than some I've seen. This is a mortiser. I suspect it's used to open up the peg box of a stringed instrument.

This lathe has a duplicator attachment. It's probably used to make pegs. It might be used to rough out the necks, also. I wish we had been given a tour of this part of the facility. I can only speculate on what they're doing in here. . .
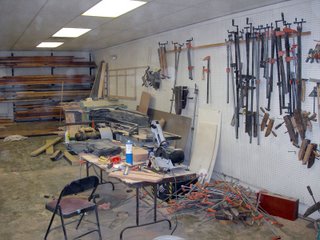
As I said, it's not a particularly tidy workshop, but it certainly appears to be in frequent usage.
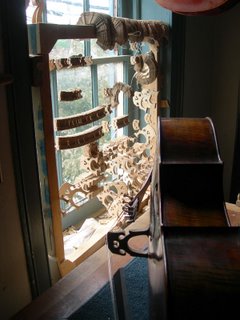
The hand work is done in the other building, upstairs from the store. I enjoyed this part of the tour very much - especially in seeing all the workbenches and parts storage. This is a rack of bridges for the various instruments. Each bridge is shaved down to fit the profile of the instrument's belly. You have to have good contact to make the vibration of the strings carry into the sound chamber of the instrument.
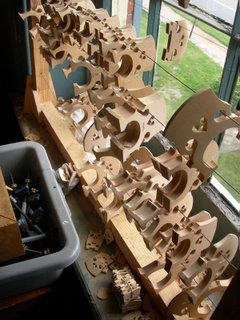
Here's a close-up view of the bridges hanging in the window.
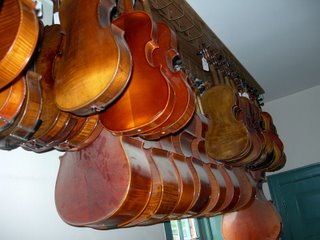
Instruments in various stages of assembly or repair are hung from wires attached to the ceiling.
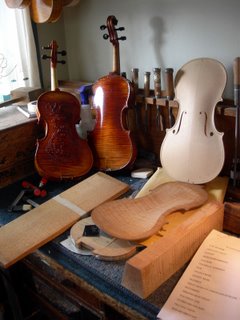
This corner is for carving the belly and back of the violins. The hand gouges are sharp. Paul gave some of the kids a chance to try their hand at carving.
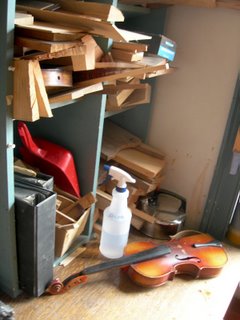
This storage bin has the split boards that will be glued up for the belly and back plate of the violin.
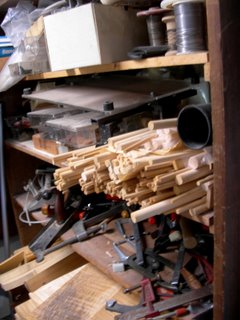
Dowels are used for the sound post, which is placed under the treble side of the bridge.
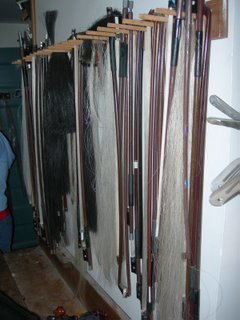
Hair from a horse's mane is used for the bow.
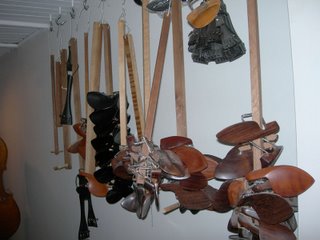
There are many different styles of chin rests for violins and violas. I use one that has a very high platform, because my neck is so long.
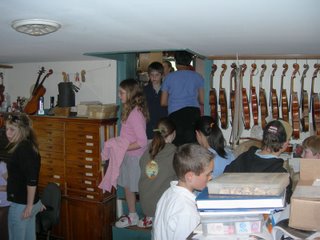
The kids were sent on a scavenger hunt, and were turned loose to explore every room in the building - and I mean, every room. There were things on the list to be found in the strangest places. . .
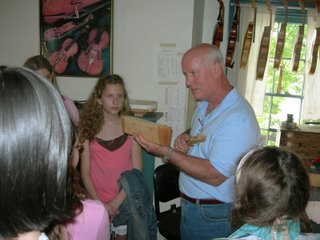
Paul explained how you go from some boards to a finished violin. He held up a stack of wood and told the kids that "this is a violin." It just takes some work to get there. . .

Violins that are beyond repair are cut up and placed in the "violin graveyard."
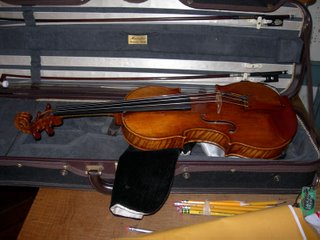
And, here's the genuine article: A stradivarious that is about 350 years old. Paul played a snippet of a tune on this for the kids. Very, very nice. . .

The trip had two parts. First to the Cincinnati Music Hall to hear a joint concert by the Cincinnati Symphony Orchestra and the Cincinnati Symphony Youth Orchestra. There were dozens of other schools from around the state also in attendance. What a zoo!

Our school had seats up in the first balcony. In the Ohio Theatre, that would be the Loge section. The seats were fine, but you have to watch out for the posts getting in the way of the view. The sound was kind of dead in that hall. One would expect a double size orchestra to really fill the place with sound, but it was very quiet during the entire concert.

Fourteen double basses for a concert? Wow! Actually, the principal bassist from CSO wasn't there, so we had only 13 basses. The last selection feature three timpani players for the last section of the music.

The next phase of the trip was a visit to the Baroque Violin Shop, which is owned by Paul J. Bartel. He's a violin maker and has two buildings. The first is a warehouse/shop/display room. He has an exhibit of Crimona violins, which is apparently his featured import. He has an exhibit showing the parts of a violin in the room where the Crimona instruments are on display.

The kids went wild in here and tried all the instruments. It was pretty stressful - not only for me as a chaperone worrying about breakage, but none of the instruments were tuned, so I had to listen to the cacaphony of dissonance.

There was an impressive selection of double basses in the warehouse.

Meghan liked this room a lot!

The workshop was in the warehouse, too. It looked liked any woodworking shop you'd care to visit. Maybe a little more chaotic than some I've seen. This is a mortiser. I suspect it's used to open up the peg box of a stringed instrument.

This lathe has a duplicator attachment. It's probably used to make pegs. It might be used to rough out the necks, also. I wish we had been given a tour of this part of the facility. I can only speculate on what they're doing in here. . .

As I said, it's not a particularly tidy workshop, but it certainly appears to be in frequent usage.

The hand work is done in the other building, upstairs from the store. I enjoyed this part of the tour very much - especially in seeing all the workbenches and parts storage. This is a rack of bridges for the various instruments. Each bridge is shaved down to fit the profile of the instrument's belly. You have to have good contact to make the vibration of the strings carry into the sound chamber of the instrument.

Here's a close-up view of the bridges hanging in the window.

Instruments in various stages of assembly or repair are hung from wires attached to the ceiling.

This corner is for carving the belly and back of the violins. The hand gouges are sharp. Paul gave some of the kids a chance to try their hand at carving.

This storage bin has the split boards that will be glued up for the belly and back plate of the violin.

Dowels are used for the sound post, which is placed under the treble side of the bridge.

Hair from a horse's mane is used for the bow.

There are many different styles of chin rests for violins and violas. I use one that has a very high platform, because my neck is so long.

The kids were sent on a scavenger hunt, and were turned loose to explore every room in the building - and I mean, every room. There were things on the list to be found in the strangest places. . .

Paul explained how you go from some boards to a finished violin. He held up a stack of wood and told the kids that "this is a violin." It just takes some work to get there. . .

Violins that are beyond repair are cut up and placed in the "violin graveyard."

And, here's the genuine article: A stradivarious that is about 350 years old. Paul played a snippet of a tune on this for the kids. Very, very nice. . .
Tuesday, May 02, 2006
Iris vase from 2002
The irises are starting to bloom on campus and in the local gardens. I don't have any irises in my yard - everytime I try to grow them I lose them to stem borers. So, I'll post pictures of a collaborative project I did with J. Paul Fennell.
I met J. Paul Fennell in 2002 on the taxi ride to the Providence, Rhode Island airport after the AAW symposium. The circumstances of that coincidence will have to wait for another posting opportunity, but we did find we had a lot of interests in common. Several weeks after that meeting, Paul emailed me to ask if I would be willing to collaborate on a project that would be a Christmas present for his wife,Judy. He was interested in having an iris motif put onto one of his vessels. Well, of course, I said "yes."
Paul sent me one of his lovely hollow forms made from mesquite. It was a little scary to think about cutting into this vessel - it felt so right as was, without any surface enhancement. It took me a couple of weeks of pondering and thinking of how I wanted to approach the design before I drew it on to the vessel. The first line burnt in was a heart stopper. Mesquite doesn't behave the way cherry and maple do, and that was what I had been used to for my work. Mesquite doesn't want a straight line burnt in - it grabs the tip and yanks it around the silica crystals in the wood. I ended up working through an impressionistic style, which did turn out ok. Here are some progress and finished pics of the project.
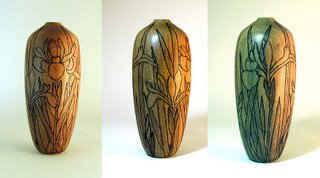
These are three views of the project after the design was burnt in, but before I did the background texturing. I didn't want to experiment on this after the design was burnt in, so Paul sent me a mock-up from mesquite and I experimented with texture patterns on the scrap piece.
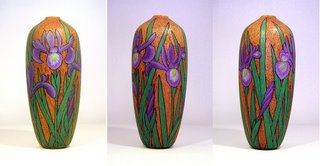
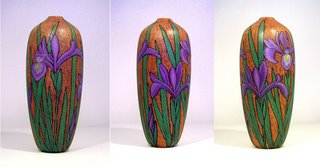
This and the next photo show the 360° view around the vase, which gives you an idea that this is a canvas in the round. The colors aren't quite correct. The flowers are more blue than purple, but I didn't mess around with photoshop to correct the color balance. I should do that sometime. . .
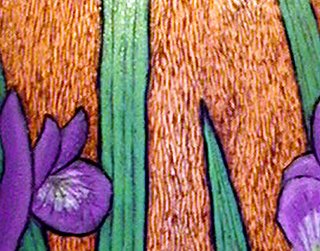
And here's a detail showing the background texture.
I met J. Paul Fennell in 2002 on the taxi ride to the Providence, Rhode Island airport after the AAW symposium. The circumstances of that coincidence will have to wait for another posting opportunity, but we did find we had a lot of interests in common. Several weeks after that meeting, Paul emailed me to ask if I would be willing to collaborate on a project that would be a Christmas present for his wife,Judy. He was interested in having an iris motif put onto one of his vessels. Well, of course, I said "yes."
Paul sent me one of his lovely hollow forms made from mesquite. It was a little scary to think about cutting into this vessel - it felt so right as was, without any surface enhancement. It took me a couple of weeks of pondering and thinking of how I wanted to approach the design before I drew it on to the vessel. The first line burnt in was a heart stopper. Mesquite doesn't behave the way cherry and maple do, and that was what I had been used to for my work. Mesquite doesn't want a straight line burnt in - it grabs the tip and yanks it around the silica crystals in the wood. I ended up working through an impressionistic style, which did turn out ok. Here are some progress and finished pics of the project.

These are three views of the project after the design was burnt in, but before I did the background texturing. I didn't want to experiment on this after the design was burnt in, so Paul sent me a mock-up from mesquite and I experimented with texture patterns on the scrap piece.

This and the next photo show the 360° view around the vase, which gives you an idea that this is a canvas in the round. The colors aren't quite correct. The flowers are more blue than purple, but I didn't mess around with photoshop to correct the color balance. I should do that sometime. . .


And here's a detail showing the background texture.